For whatever reason, the theme from Rawhide has been going through my head. I wish herding my personal "cats" were as easy as herding cattle *sigh*. Toddlers, teenagers, hubands, bureaucrats, and just insanity in general. It doesn't leave a ton of time to just sit and stitch...boy, I sure miss that! So, I haven't gotten as much done as I had wished, but I haven't been totally stationary. I did get a couple of small things done, and I did the finishing for a couple of pieces a friend made.
First things first, I got pictures from the snowflake pouch I made. The recipient was an angel and made some wonderful photos for me.
Not bad. I was pretty pleased with how the silver leather worked for the outline. Just a few beads added a bit of sparkle without making it too much for the person who I made it for. She seems happy, so I did my job right :)
I haven't gotten much else done over the past month, but a few things were finished. I did get some needlebooks finished. I made one as a prize for a contest,and two to be given as gifts. I also did the finishing on a couple of pieces that a friend made. She does beautiful work, but then never knows what to do with them, so she gives some of them to me to finish and then give as gifts. That's one of the best parts of the SCA to me...I always have an excuse to make things, and a place to give them away. It works for me.
This was made for an Arts and Sciences contest winner. She got to pick the colors, and I aimed the design towards her liking of Scandinavian and Moorish medieval cultures. The button is made of linen fabric and the loop was created with a tatting style button-hole stitch. It was worked in cross-stitch in silk thread on 28ct even weave and then finished with linen fabric and wool felt pages.
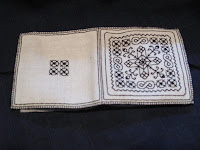
These were the needlebooks for gifts. Simple blackwork designs worked on 28ct even-weave in silk thread and then finished with linen linings and wool felt pages. I used ties for these books as a button would have thrown off the design. I am working on another contest prize, and I will post pictures when it gets finished.
Other than the needlebooks, I have been doing more research on the Tudor dress I want to do. Yeah, I know...this is the reason I started this blog in the first place. However, Margo Anderson has come out with a Tudor women's pattern, and I have been breathlessly waiting for it to appear. I recieved it two days ago, and have been avidly going over it. What makes me really happy is that it is actually confirming some of the ideas I already had formed while looking at extant examples and paintings. I am feeling far more confident at making at least a working woman's Tudor dress, for starters. Now I just have to find the time....*sigh*. the really silly part is that I need to make the kirtle first, and then the smock...but it is the smock that I want to get to so I can blackwork it :) Oh well, patience is a virtue.
Anyway, that is it for now. I am glad that I at least got one post in for September, even if it was cutting it close to the end of the month. I know that there really isn't anyone reading this, but it does me good to set a goal of at least a once a month post to help keep me on some kind of track. It helps...
Monday, September 28, 2009
Tuesday, August 18, 2009
Deep Breaths
Purgatorio/Oerthan Coronet and the local fair are Over! This means that all the projects I had major time limits on are now done, and I am now slipping back into the relatively quiet school year. Things can now get back to a more concrete routine, and I might actually get more done. Besides, snow will be falling soon enough, and I will be back to my warm and fully indoor arts.
So, what did I get done? Well, the rose pouch I posted pictures of a while ago. I also got the snowflake pouch done. It was in the same style as the rose pouch, but it was done in blue velvet with white wool and silver leather instead of the gold. I also added a few beads as accent and put the intended recipient's initial in the center of the snowflake. I think it came out lovely, and she did seem happy with the finished pouch. Silly me though, I didn't get pictures of that either. I seem to be really bad about taking pictures of my work before it gets given away. I am trying to get pictures of the pouch, I hope to have some soon.
I did get one new basic smock made. It is mostly machine stitched, but I hand finished the seams on the sleeves and did the hem and cuffs as well as the neckline. I used a pearl for the cuff button, and used a needlelace stitch to create the buttonhole. I got the sleeves assembled by hand for the other new smock and I have a general idea for the blackwork on the sleeves themselves. I have the cuffs blackworked, but not assembled yet. I am using the Janet Arnold Patterns of Fashion Volume 4 as the heavy part of my research. It is one thing to look at paintings of pieces, and another to see an actual piece, even if it is just a photograph of one. Her book has been a blessing to me. I am really hoping to have the new Tudor kirtle and overdress done by the Oerthan Winter Coronet and the best part would be the smock. It will all depend on health and other distractions as to what I actually get done.
Other things I got done...I made a new bodice for my old Flemish/Tudor kirtle. It is one I made several years ago. It is blue linen with an inner heavy canvas layer and lined in blue linen for the bodice and a cream linen for the skirt. It is one of my favorite kirtles, and the bodice was well loved and worn. Some of the eyelets were tearing and it did need some resizing. Much to my happiness, I found remaining fabric from when I made it, tucked into the back corner of my fabric stash. I was very happy to have an exact match for making the new bodice. The assembly went well, and it looks good...my only disappointment is that the new bodice ended up a bit big. It is a hazard of resizing something and not being able to pin oneself. I will tweak it sometime this fall.
Other than finishing the journey bags I discussed in my last note and the stuff I noted above, my last major project was three "toy boxes". I purchased three 7"x9.5" unfinished boxes and painted one in Kingdom colors, one in Principality colors, and one in my Barony's colors. I then decoupaged the Arms of each on top of correct box. I then purchased doll clothespins, the doll stand bases for the pins, 2" round wood balls, 1.5" flat coin shapes in wood, .75" wood square blocks, and thin wooden dowels. Using the information I found, and a bit of imagination, I was able to create four game sets for each box. The dowels were cut to 8" lengths and then painted colors, sealed and turned into pick up sticks. The little wood blocks I painted and then marked as die. Even though they weren't made for such a use, they actually roll pretty randomly, so they are reasonably suited for dice. The flat coin shapes were painted one color on one side, and another on the other side, and then I made a basic "tic tac toe" board out of muslin. There was the third game. The last game required me painting the clothespins and gluing them into the doll bases so that they could be free standing. I then painted the balls and those two things were then a tabletop set of nine-pin. I put together a set of the period rules for all the various games, and included an additional page of period and peri-oid games that could be used to entertain kids as events. That includes the much older "kids" as well. I had a great deal of fun playing a version of Yacht with the dice. I used pre-cut wood pieces and acrylic paints and sealers. I wanted to show that it only took basic skills and little cost to put together a simple toy kit. I also wanted to keep the items as safe as possible for any kids that might play with them. There are no sharp edges, non-toxic paints were used and there were no points on the sticks. I gave away the other two boxes to the places they needed to go, so all I have to get pictures of is the one I did for the Barony.
Once again, me not taking pictures.
Anyway, that is it for now. I have a stumpwork rose I am finishing as well as a couple of needlebooks. I then need to kick back into gear on the Tudor. Till next time...
Saturday, July 18, 2009
Projects, Projects, Projects...
First things first. I have pictures of the garter!
The bride added the brooch as her "something old" as it is a treasure from her Grandmother. I think it did turn out quite nice. And the bride was very nice in being willing to slip on shorts and let me take quick pictures while we were visiting. Yea! She has promised me some of the professional shots when she gets her wedding pics, but those will go in my portfolio as they aren't really mine to share. These will have to do :)
The next accomplishment of the past two months is that I finished my Rose Pouch. this pouch is to be a gift for when a Queen of the West Kingdom (SCA) steps down. I found many different style of pouches and purses, and I really liked the ease of use in a ring style pouch.
http://www.kikirpa.be/
This site had a wonderful ring pouch with a "lid" of sorts that would provide a place in which to embroider the rose. I then chose to make the top circular as well so that I could fit it with a ring also and give the whole top more structure. I am not sure if that really was period or not, but for this project it made a sort of sense. I made the pouch itself out of two layers of heavy linen suiting. It should wear well and it looks good. I will admit that I am becoming a bit spoiled. I really LOVE working with linen, especially when hand stitching.
The lid itself is out of 100% wool felt with wool applique and gilded leather edging. I added glass seed beads in the center of the rose as "seeds". I am very pleased whit how it turned out, and I am really hoping that she likes it also. the bummer part is that I will have to wait till January to find out :)
Here are a few pictures...
The leather itself is fine pigskin and is actually pretty easy to use. I used silk and cotton threads, and I padded the lid with cotton batting. The belt loop is two layers of the linen and one layer of the wool, all stitched together. Hopefully it will put up with some abuse.
I have one more pouch to finish. It is the same style, but a bit trickier as it is a snowflake edged in silver leather. It is tough to keep the snowflake "airy" while edging it. I am going to add beads to it also so that it has a bit of sparkle.
the very last project in motion for the August event is the "journey" bags for the kids' activity. The kids get to go on a search to find the different royals and officers that are at the event, and in return they get neat tokens that those people have made. The bags are for them to decorate to their heart's content, and then to use to keep the tokens in as they journey. The bags are simple muslin bags with twill tape handles.
Quite simple...just a rectangle with the strap sewn to the sides. It is double layered, so it should hold up for a while. They are easy to make, the big trick is that I have to get 50 of them made. Oh well :)
I probably won't bother with any new garb at all for the event. I do have the cuffs done for the smock, but I really don't want to do a rush job on that. It will just have to wait. If I do anything at all, I will remake the bodice on my old blue kirtle so that it fits a bit better. But we shall see.....
Monday, July 6, 2009
Garters, coats, and Pick-up-Sticks....
I just realized that it has been a full two months since I have written last. Where on earth did the time go? I haven't been as on task as I would like, but I have actually gotten a few things done.
First, I did get the wedding garter finished. Whew! I put the last few stitches in the ribbon and elastic as we drove from Fairbanks to Anchorage. I personally think it turned out beautiful, and the bride seems to be quite pleased with it, so I can't complain. The stupid bit is that I never took a picture of the final project :( The bride has promised me a good picture of it once things get settled down. As soon as I have one, I'll post it and show off a bit :)
The second accomplishment of the past month or so was the completion of my daughter's rapier "armor" coat. She is involved in rapier, or as known in the SCA "light fighting", and needed a coat and hood for protection. These items needed to be made out of material that equaled 4 layers of trigger poplin and could pass a puncture test. I lucked out and was able to get a few yards of "spectra" cloth that is used in the layering of professional fencing jackets. It is puncture resistant, and is equal to two layers of trigger so the jacket will be as safe, but lighter to wear. I sandwiched the spectra between the remaining two layers of trigger needed, and with a few design modifications was able to make her a safe, durable and reversible coat. That was the tricky part really. It was a bit of a challenge to figure out how to fasten the coat so that it could be worn either way and still be usable. I am pretty pleased with how it turned out, and she seemed to be as well. I am still adding some trim to the hood to jazz it up a bit, but otherwise the coat set is done. All that is left now is to get her a gorget (a neck protector) made before July 10th. I have a bit of help for that, but we just have to get our schedules to connect, and that is no small task.
The other bit I had to deal with was our end of May SCA event, Spring Captaincy. This is actually a pretty full event as there is heavy fighting, often a class or two, and a feast. It was a very fun event this year because the autocrats in charge decided upon a Viking theme with Valkyries included. During the event I hosted a competition for period toys, that is any toy that could be documented pre-1600. For my "seed" entry (an entry to show an example, but not one that will be judged) I entered a set of Pick-up-Sticks that I had made using skewers with the points cut off. Here is my write up for the set I made:
Pick-up Sticks
Pick-up sticks have been around for a very long time and in many different cultures. Their origin can be traced back to ancient China when painted sticks were used for divination in a “game” called Chien Tung. These sticks were placed into a tube and then sealed with a lid that had a hole in it. The tube was shaken and one stick was allowed to fall from the hole. Based on the painting on the stick a fortune was told. Later the divination game changed into a game of chance where the sticks were picked up one at a time with the help of a black “Emperor” helper stick. This game eventually made its way into Europe where it became known as Spilikins (or Spillikins). It can also be found in France as Jonchets and the Americas as Pick-up-Sticks or Jackstraws.
The sticks themselves have been made of various materials such as ivory, bone, wood (like maple, oak, walnut, cherry, and bamboo), reed, rush, yarrow and even wheat straw (thus the name Jackstraw). In a variation of the game, the pieces are not sticks but little carved weapons or tools. The sticks can be painted colors or carved and different points can be given for the different types of sticks.
The main thing with all the variations of the game is that it is a game of physical skill and dexterity. The sticks are held in one hand with their bottoms touching the surface, and then are let go to fall in a pile. Players then take turns removing one stick at a time without disturbing the remaining sticks. If another stick moves, then the player is out and loses his/her turn. A separate stick can be used to help a player remove other sticks depending on the version of the game. The winner of the game can either be the person with the most sticks, or if colors/carvings are used, then the person with the highest points may win.
For my set I used bamboo skewers. These are easy to find and to cut to size and bamboo was a natural material used long ago. I chose to remove the taper from my ends although that can be a choice of design. I then colored my sticks with ink paints resembling madder, yarrow, and indigo dyes and the combinations there of. I made one stick black to be used as the “helper stick”. If I could have used natural dyes, I would have. I didn’t have easy access to them so I chose to use “sharpie” markers in the right tones. This provided a solid color that would last through children’s tough play. To finish the game set, I put together a pouch of cotton material double layered so that the sticks would not be able to easily wear a hole through the fabric. Although I used cotton (due to the fact that I had the fabric available) it is more likely that wool or linen remnants would have been used.
References
Culin, Stewart; University of Pennsylvania (1895). Korean Games With Notes on the Corresponding Games of China and Japan. (Ed. 1958/1960) Games of The Orient. Rutland, Vermont: Charles E. Tuttle Company. 177 pages. (orig. Ed. 1991) Korean Games With Notes on the Corresponding Games of China and Japan. Dover Publications. 256 pages. ISBN 0-48-626593-5
Bell, Robert C.; Oxford University Press (1960 & 1969). 2 volumes. Board and Table Games from Many Civilizations (rev. ed. 1979). Dover Publications. 448 pages. ISBN 0-48-623855-5.
Wikipedia. 13 April 2006. http://en.wikipedia.org/wiki/Pick_up_sticks
I am hoping to get a toy set made for the Kingdom and Principality by the Purgatorio event this August. My intent is to have several strictly period toys and games in a small box so that the Minister of Children can always have at least a few toys and game ideas on hand. It is far too easy to forget that kids need activities also, and it can be rather jarring to be enjoying the medieval atmosphere of an event and be confronted with very plasticy and modern toys, as well as kids running willy nilly because they are bored. I have the materials for pick-up-sticks, a dice game, nine pin (table top style), and tic-tac-toe (or nine man morris) so far. The materials will all be wood and cloth and I hope to have a small booklet with instructions and rules for other styles of medieval games. I am mainly aiming this kit at ages 4-10, but it could easily be used by older kids as well. I'll get pictures up as I get things finished.
On a non-medieval craft sort of note, I finished up another couple of small projects I had been doing. The first one was a name tag for our local needlework group. I love my old one that I did with plastic and paper canvas and beads, but I recently got a hold of a bunch of rather flamboyant colored Perl cotton that just begged to be used. I had a small bit of vinyl canvas that would be a good base for something as used as a name tag, and so I got creative. I do have a fondness for bumblebees, so I tweaked a couple of various partial patterns I found and combined the fibers, the canvas and a slew of various beads...and voila! A name tag that sure sticks out! I think it turned out cool. I'll still keep the old one and tuck it into my workbag also. It's too cute to not keep.
The old one....
The new one!
The last project for this blog is the witch I needle felted. I bought a kit, several years ago, for a needle felted wizard. I finished him up last year and was quite please. However, I had a great deal of the material left over...more than enough to make him a companion. So I created a witch. She was actually a lot of fun. I made her the basic same way as the wizard, but gave her much more shape through the body and spent even more time on her face. I am still not 100% happy with the hands, but I think doing them will get easier with practice. My next "wish-list" project for needle felting is a schnauzer. I have the stuff, now it is just finding the time...
That's it for today...much more tomorrow...
First, I did get the wedding garter finished. Whew! I put the last few stitches in the ribbon and elastic as we drove from Fairbanks to Anchorage. I personally think it turned out beautiful, and the bride seems to be quite pleased with it, so I can't complain. The stupid bit is that I never took a picture of the final project :( The bride has promised me a good picture of it once things get settled down. As soon as I have one, I'll post it and show off a bit :)
The second accomplishment of the past month or so was the completion of my daughter's rapier "armor" coat. She is involved in rapier, or as known in the SCA "light fighting", and needed a coat and hood for protection. These items needed to be made out of material that equaled 4 layers of trigger poplin and could pass a puncture test. I lucked out and was able to get a few yards of "spectra" cloth that is used in the layering of professional fencing jackets. It is puncture resistant, and is equal to two layers of trigger so the jacket will be as safe, but lighter to wear. I sandwiched the spectra between the remaining two layers of trigger needed, and with a few design modifications was able to make her a safe, durable and reversible coat. That was the tricky part really. It was a bit of a challenge to figure out how to fasten the coat so that it could be worn either way and still be usable. I am pretty pleased with how it turned out, and she seemed to be as well. I am still adding some trim to the hood to jazz it up a bit, but otherwise the coat set is done. All that is left now is to get her a gorget (a neck protector) made before July 10th. I have a bit of help for that, but we just have to get our schedules to connect, and that is no small task.
The other bit I had to deal with was our end of May SCA event, Spring Captaincy. This is actually a pretty full event as there is heavy fighting, often a class or two, and a feast. It was a very fun event this year because the autocrats in charge decided upon a Viking theme with Valkyries included. During the event I hosted a competition for period toys, that is any toy that could be documented pre-1600. For my "seed" entry (an entry to show an example, but not one that will be judged) I entered a set of Pick-up-Sticks that I had made using skewers with the points cut off. Here is my write up for the set I made:
Pick-up Sticks
Pick-up sticks have been around for a very long time and in many different cultures. Their origin can be traced back to ancient China when painted sticks were used for divination in a “game” called Chien Tung. These sticks were placed into a tube and then sealed with a lid that had a hole in it. The tube was shaken and one stick was allowed to fall from the hole. Based on the painting on the stick a fortune was told. Later the divination game changed into a game of chance where the sticks were picked up one at a time with the help of a black “Emperor” helper stick. This game eventually made its way into Europe where it became known as Spilikins (or Spillikins). It can also be found in France as Jonchets and the Americas as Pick-up-Sticks or Jackstraws.
The sticks themselves have been made of various materials such as ivory, bone, wood (like maple, oak, walnut, cherry, and bamboo), reed, rush, yarrow and even wheat straw (thus the name Jackstraw). In a variation of the game, the pieces are not sticks but little carved weapons or tools. The sticks can be painted colors or carved and different points can be given for the different types of sticks.
The main thing with all the variations of the game is that it is a game of physical skill and dexterity. The sticks are held in one hand with their bottoms touching the surface, and then are let go to fall in a pile. Players then take turns removing one stick at a time without disturbing the remaining sticks. If another stick moves, then the player is out and loses his/her turn. A separate stick can be used to help a player remove other sticks depending on the version of the game. The winner of the game can either be the person with the most sticks, or if colors/carvings are used, then the person with the highest points may win.
For my set I used bamboo skewers. These are easy to find and to cut to size and bamboo was a natural material used long ago. I chose to remove the taper from my ends although that can be a choice of design. I then colored my sticks with ink paints resembling madder, yarrow, and indigo dyes and the combinations there of. I made one stick black to be used as the “helper stick”. If I could have used natural dyes, I would have. I didn’t have easy access to them so I chose to use “sharpie” markers in the right tones. This provided a solid color that would last through children’s tough play. To finish the game set, I put together a pouch of cotton material double layered so that the sticks would not be able to easily wear a hole through the fabric. Although I used cotton (due to the fact that I had the fabric available) it is more likely that wool or linen remnants would have been used.
References
Culin, Stewart; University of Pennsylvania (1895). Korean Games With Notes on the Corresponding Games of China and Japan. (Ed. 1958/1960) Games of The Orient. Rutland, Vermont: Charles E. Tuttle Company. 177 pages. (orig. Ed. 1991) Korean Games With Notes on the Corresponding Games of China and Japan. Dover Publications. 256 pages. ISBN 0-48-626593-5
Bell, Robert C.; Oxford University Press (1960 & 1969). 2 volumes. Board and Table Games from Many Civilizations (rev. ed. 1979). Dover Publications. 448 pages. ISBN 0-48-623855-5.
Wikipedia. 13 April 2006. http://en.wikipedia.org/wiki/Pick_up_sticks
I am hoping to get a toy set made for the Kingdom and Principality by the Purgatorio event this August. My intent is to have several strictly period toys and games in a small box so that the Minister of Children can always have at least a few toys and game ideas on hand. It is far too easy to forget that kids need activities also, and it can be rather jarring to be enjoying the medieval atmosphere of an event and be confronted with very plasticy and modern toys, as well as kids running willy nilly because they are bored. I have the materials for pick-up-sticks, a dice game, nine pin (table top style), and tic-tac-toe (or nine man morris) so far. The materials will all be wood and cloth and I hope to have a small booklet with instructions and rules for other styles of medieval games. I am mainly aiming this kit at ages 4-10, but it could easily be used by older kids as well. I'll get pictures up as I get things finished.
On a non-medieval craft sort of note, I finished up another couple of small projects I had been doing. The first one was a name tag for our local needlework group. I love my old one that I did with plastic and paper canvas and beads, but I recently got a hold of a bunch of rather flamboyant colored Perl cotton that just begged to be used. I had a small bit of vinyl canvas that would be a good base for something as used as a name tag, and so I got creative. I do have a fondness for bumblebees, so I tweaked a couple of various partial patterns I found and combined the fibers, the canvas and a slew of various beads...and voila! A name tag that sure sticks out! I think it turned out cool. I'll still keep the old one and tuck it into my workbag also. It's too cute to not keep.
The old one....
The new one!
The last project for this blog is the witch I needle felted. I bought a kit, several years ago, for a needle felted wizard. I finished him up last year and was quite please. However, I had a great deal of the material left over...more than enough to make him a companion. So I created a witch. She was actually a lot of fun. I made her the basic same way as the wizard, but gave her much more shape through the body and spent even more time on her face. I am still not 100% happy with the hands, but I think doing them will get easier with practice. My next "wish-list" project for needle felting is a schnauzer. I have the stuff, now it is just finding the time...
That's it for today...much more tomorrow...
Wednesday, May 6, 2009
The Lowly Bauble: A Tool of Fools
So here goes... I am going to try and see if I can cut and paste my documentation about the fool's bauble. Hopefully this will work :)
The Lowly Bauble: A Tool of Fools
From the Webster’s dictionary…Bauble: 1) A small showy ornament of little value; a trinket. 2)Archaic: A mock scepter carried by a court jester. Middle English: babel, from old French, meaning plaything.
In picturing a fool from the 13th to the 16th century, it is often seen in pictures as a person dressed in motley (parti-colored clothes), a belled hat, and carrying a scepter with a model of a head on it. Searching through different sources, I came across many paintings and illuminations of fool’s with these scepters. They are often shown as being just the head, covered in a hat that usually matches the clothing of the fool in the picture. In the Bible du XIIIe siecle, there is an illuminated page showing a fool in a yellow hat with ears on it and the head of a bird on the top of the hat. He is carrying a scepter that is matched to his hat, including the bird shape on top. However, in the Grimani Breviary, known as the codex, an illumination there shows a fool with almost corn-rowed hair carrying a bauble that has a hood while he himself does not. In the painting The Ship of Fools, by Hieronymus Bosch, there are many foolish people portrayed, and one true fool. He has a bauble that is more like a staff in its length. It is also topped by a head with a similar hat to the fool pictured.
For building my bauble, I relied most heavily on two actual baubles that are housed in the Nurnberg Museum in Germany. Both baubles have ivory heads and are dressed in brocades and velvets with bells on the ends of the dags that surround the heads. I used clay instead of ivory since there are many extant examples of dolls and toys created from clay and it was the most cost effective material I had at hand. I believe that it is still a good choice as it might have been used for less opulent baubles. Clay, now as then, is still a durable material that allows great detail, but is easier to obtain than ivory. The clay I used was an air hardening clay with the look and feel of a terra cotta clay. I would have loved to use real terra cotta, but as I do not have current access to a kiln, I made do.
For the hood and “body” of my bauble, I chose to use cotton fabrics for the cost, but the prints where chosen for fun, not period “proper-ness”. The colors of black and white are our Barony’s colors, and as this fool was being made for our local “Fool’s Revel” the colors and patterns were appropriate. I painted the face in gauche/watercolor paints and then protected it with a natural varnish. I tipped the ends of the dags with bells just as the two examples showed. I ended up making two, one as a gift to our stepping down “Baronial Fool” and one to keep as they came out so neat.
References:
The Weidner 13th Century Bible http://www.leavesofgold.org/learn/children/slideshow/widener2_text.html
Bible du XIIIe siecle
King David and a Fool by the workshop of the Master of the Echevinage de Rouen, France, Rouen, c. 1465-75
The Free Library of Philadelphia, Rare Book Department, Widener 2, fol. 290
The Web Gallery of Art http://www.wga.hu/index.html
Grimani Breviary1490-1510
Illumination on parchment; Biblioteca Nazionale Marciana, Venice
The Ship of Fools: Hieronymus Bosch 1490-1500
Oil on wood, 58 x 33 cm; Musée du Louvre, Paris
http://www.fathom.com/feature/122350/ Fooling Around the World: The History of the Jester. From University of Chicago Press, by Beatrice K. Otto.
The Lowly Bauble: A Tool of Fools
From the Webster’s dictionary…Bauble: 1) A small showy ornament of little value; a trinket. 2)Archaic: A mock scepter carried by a court jester. Middle English: babel, from old French, meaning plaything.
In picturing a fool from the 13th to the 16th century, it is often seen in pictures as a person dressed in motley (parti-colored clothes), a belled hat, and carrying a scepter with a model of a head on it. Searching through different sources, I came across many paintings and illuminations of fool’s with these scepters. They are often shown as being just the head, covered in a hat that usually matches the clothing of the fool in the picture. In the Bible du XIIIe siecle, there is an illuminated page showing a fool in a yellow hat with ears on it and the head of a bird on the top of the hat. He is carrying a scepter that is matched to his hat, including the bird shape on top. However, in the Grimani Breviary, known as the codex, an illumination there shows a fool with almost corn-rowed hair carrying a bauble that has a hood while he himself does not. In the painting The Ship of Fools, by Hieronymus Bosch, there are many foolish people portrayed, and one true fool. He has a bauble that is more like a staff in its length. It is also topped by a head with a similar hat to the fool pictured.
For building my bauble, I relied most heavily on two actual baubles that are housed in the Nurnberg Museum in Germany. Both baubles have ivory heads and are dressed in brocades and velvets with bells on the ends of the dags that surround the heads. I used clay instead of ivory since there are many extant examples of dolls and toys created from clay and it was the most cost effective material I had at hand. I believe that it is still a good choice as it might have been used for less opulent baubles. Clay, now as then, is still a durable material that allows great detail, but is easier to obtain than ivory. The clay I used was an air hardening clay with the look and feel of a terra cotta clay. I would have loved to use real terra cotta, but as I do not have current access to a kiln, I made do.
For the hood and “body” of my bauble, I chose to use cotton fabrics for the cost, but the prints where chosen for fun, not period “proper-ness”. The colors of black and white are our Barony’s colors, and as this fool was being made for our local “Fool’s Revel” the colors and patterns were appropriate. I painted the face in gauche/watercolor paints and then protected it with a natural varnish. I tipped the ends of the dags with bells just as the two examples showed. I ended up making two, one as a gift to our stepping down “Baronial Fool” and one to keep as they came out so neat.
References:
The Weidner 13th Century Bible http://www.leavesofgold.org/learn/children/slideshow/widener2_text.html
Bible du XIIIe siecle
King David and a Fool by the workshop of the Master of the Echevinage de Rouen, France, Rouen, c. 1465-75
The Free Library of Philadelphia, Rare Book Department, Widener 2, fol. 290
The Web Gallery of Art http://www.wga.hu/index.html
Grimani Breviary1490-1510
Illumination on parchment; Biblioteca Nazionale Marciana, Venice
The Ship of Fools: Hieronymus Bosch 1490-1500
Oil on wood, 58 x 33 cm; Musée du Louvre, Paris
http://www.fathom.com/feature/122350/ Fooling Around the World: The History of the Jester. From University of Chicago Press, by Beatrice K. Otto.
Friday, May 1, 2009
Geez! I let the entire month of April whiz past without a single post...and I know it didn't feel all that busy! Must have been though....
I did get a few things done. I have about 20 inches of lace done...only 20 or so more to go. My aim is a full 48 inches to give the garter a good full ruffle, but anything over 36in will do that. I also got about 24in of the blackwork cuffs done. That is enough for two cuffs with ruffling. I hope to get enough more done to get the cuffs for my Husband's smock as well. I also focused on getting our deck clear and prepped for the summer. All the snow is gone, the umbrellas and canopy are up, the kids toys cleaned and up, and we have fired up the BBQ. It has been in the mid 70's for the past few days...Heaven! My Sister-in-law in Dallas said that we were only three degrees cooler yesterday (4/30) that they were. Insane! Texas and Alaska both the same warmth, in April?! I am not arguing, it was too darn nice sitting on the deck and making lace.
My main distraction for the moth of April was in getting our local SCA Barony's Fool's Revel organized. I was the "autocrat" (person in charge) for the event, and it fell to me to get the site, arrange the activities, and generally make sure everything went off without a hitch. It was worth the effort though. The food was great, we had lots of people come, and it sure did seem as if everyone had fun. Their Highnesses traveled from Wasilla and joined in our silliness, and that just added even more fun to the mix. If you want to see just a bit of the things we did, you can check out http://www.youtube.com/watch?v=gijvYmBVVLw&feature=channel_page for some of the heavy fighting. As we didn't have enough eligible heavy fighters for the Champion for the College of St. Boniface tourney, the Seneshal of the college opened the tourney to a "Rock, Paper, Scissors" tourney that anyone could then partake in. It was such a highlight of the event, that the Seneshal thinks that it might just happen once a year. You can check it out at http://www.youtube.com/watch?v=rwphBNTC5JI&feature=channel (Part 1) and http://www.youtube.com/watch?v=gyW90z4csV0&feature=channel (Part 2).
Part of my job in the Barony is the Arts and Sciences Office. My duties are to help encourage people's interest in different aspects of the past. I will admit that my offerings tend to be heavy in the needleworking areas as that is what I am most proficient in, and where my interest lies. I do try hard to bring in other aspects though, and events are one way I can do that. I usually host a competition that fits with the "theme" of the event and allows those interested to try their hand at something new. For this year's Fool's Revel, I redid a competition I offered several years ago...The Fool's Tools. I was hoping that people would be thinking about what a fool did, what they wore, and what "tools" they might have used. The winning entry this year was a baldric made from playing cards and chess pieces. While not exactly "period", it was this person's interpretation of what she thought a fool might use...and it went very well with her chess pieces coathardie she made as well.
That's it for the moment. If I can figure out how to do it, I will post my old entry from the first time the contest for "Fool's Tools" was held. Till then!
Tuesday, March 31, 2009
It's been almost a full month since I posted last. I am not surprised, but I am disappointed in myself. I haven't been on the ball as much as I would like. However, I have gotten some different things done over this past month.
First, our local needlework group had our monthly meeting on Monday, March 16th, and the class taught was on Kumihimo Japanese braiding. I have watched several of my friends over the past year as they have made these really pretty and sometimes ornate cords using a disk and bobbins. The cords they were making were thicker and more fancy than those I can make using the Viking braiding. I have wanted to learn, but each time there was a class in our SCA group, I got called away for one reason or another. The North Star Needlework Guild is a modern needlework guild, and we strive to teach different classes all year long...this time I could actually just SIT there and learn the technique. So far I have just learned a simple 7 strand project, but I hope to keep learning new patterns as I go along. It is a project that is just the right size to slip in to a purse and travel. Wheee!
I have finished a few more inches on the garter and have about 10 inches of blackwork done.... I'll keep plodding along on those. I am hoping that as the sun returns and the days keep getting brighter and warmer, that I will get my energy back too. I think of it as kind of a solar battery...and this Alaskan gal has been run down for a while. It is pretty today though, even with the new inch of snow. I sure am getting tired of white though.....Come On Green!!!
Monday, March 9, 2009
It was a busy weekend, as usual. I did get a little bit done, but I had to spend most of Saturday out and about doing Girl Scout cookie sales and attending a 1yr old's Birthday party. I then had guests in the evening playing Tarot (an awesome card game...makes pinochle look Easy!!). Needless to say, Saturday was shot for getting needlework done. I did work on some during fighter practice on Sunday, and I got my cuffs back out to work a bit more on them as well.
My main accomplishment for the weekend was getting some bobbins made up for making Viking Whipcord. My mentor agreed to do the site tokens for a big event this fall, and he needs to have cord enough for about 300 tokens both in necklace and bracelet sizes. He decided on doing Viking braiding and got a set of wooden spatulas to use as bobbins. They work, but are rather unwieldy to catch and return. (If you don't know what the heck I am talking about, and would like to know...check out http://genvieve.net/sca/whipcording-howto.html). The lovely lady who taught me how to do the braiding long ago, used wooden snowmen forms that she found on clearance at Joann's Fabrics. Well, me being the rather anal person I am, though that the spatulas stink for making that much cording and I wasn't lucky enough to find the snowmen anywhere. So, I took it upon myself to make my own. I was silly in that I didn't check out the web before I went shopping, or I would have found this web page with a way to make them http://www.wymarc.com/artifacts/classes/Whipcord%20bobbin%20handout.pdf.
Funnily enough, going on my own to the craft store and creating my own design, my bobbins strongly resemble his. Great minds think alike I guess. His have less of a neck, but since I do bobbin lace making, I made the Viking bobbins resemble more of what I would use for bobbin lace, only much larger. I found all the wood bits at the local Michaels Crafts, and it was pretty inexpensive. Here is what I did....
Parts:
3-3/8" Shaker pegs
3" Candlesticks
2" doll head balls
I wrapped the ends of the shaker pegs with glue and size 10 crochet cotton. This is what I am using for the cording, so it was on hand. It fills the gap between the candlestick and the peg, and provides even more surface area for the glue to bond. I used Aleene's Tacky Glue for putting the pieces together.
Glue the shaker peg to the candlestick
Glue the ball to the bottom
Set aside and let dry (the tops of the cording balls worked great for holding them to dry, but dixie cups might work as well).
I found that they are good to go within an hour or so, and Aleene's Glue will put up with most anything. On a whim I gave one of the bobbins to the 10 month old running around the house, and she didn't manage to get it apart...drool and everything. They work really well for making the cord, and they feel good in the hand. They also have the benefit of looking similar to bobbins used in the Viking era. They should also be good for making cording with many different weights and kinds of threads. I will probably put a coat of sealant over the wood, or I may just wax them instead....not sure yet. I used a playing card holder and a small binder clip to help control the finished cording. You can get those at toy stores, or at least that is where I got mine. I hang the bobbins by a knot on a nail over my kitchen doorway. It lets me work a necklace length before have to wind it up.
Don't they both look thrilled? :) Actually, they enjoy making the cording, they just don't like getting their picture taken doing it..not that I blame them! I managed to make 4 sets of bobbins: one I gave one set to my mentor, one for myself, and two are going to be available for anyone to use to help in making the cording. The colors I used are royal blue, green, gold and silver which are the four colors being used by the two groups the event is for in August. It does make a neat looking cord. Anyeay, that's done...now back to stitching blackwork!
Friday, March 6, 2009
I know, I know....still behind and as scattered as ever :) Oh well, it is the story of my life. I have gotten a bit done though. I have about 10 inches of lace done and it looks pretty good. If I can stay at this pace, then I have no worries on it being finished well before the wedding. That is good :) I do have to get my friend started on her little "Baby Heather" edging for the sheets though. I'll probably end up helping do the pillowcases, but I would love to see her finish the sheet edging on her own.
I cut out the smock and shirt cuffs and have left them as one long strip. I put the strip onto a scroll frame and then transferred my blackwork pattern onto the fabric using a water erasable pen that I have had good sucess with in the past. I chose to use silk to stitch with as it seems to be the thread of choice in the extant examples shown in the Janet Arnold books, and I am using black to keep the color theme going in the outfit. I am using Rainbow Gallery's Splendor 12 ply silk, and I have broken it down to two thin strands that I am stitching with. this is a good long strand silk and is actually pretty tough thread, but very nice to work with. I want the stitching durable since it will be on my smock and my husband's shirt, but I also want it to look correct and feel good both in the stitching and in the wearing. I am also trying to keep it as reversable as possible, but I do have to tie it off somewhere, so I do have the occasional thick spot. I see that also in the surviving peices, so I don't feel too bad about mine.
Here's the front...
and here's the back....
I've been doing the double running stitch along the vine and then around the leaves and through the next section of the vine. I leave the vine undone until I run out of thread, and then I start my new thread at the beginning of the vine section, filling in until I get to where I left off. It works, and it leaves fewer bulky sections, I think...
I am paranoid about getting it dirty, so I have only been stitching on it at home and then only when the babies are napping or it is late and the kids are in bed. Needless to say, it has been slow going so far.
Another thing that has been slowing me down is simply that between the teething babies I watch, and my own kids' activities, I have been running around pretty crazily. Between Scouting and TaekwonDo, I have been doing a lot of waiting around but away from home. Being the person I am, I can't just wait around, I need to do Something! So I picked up some beautiful bamboo and acrylic yarn and am crocheting myself a scarf. I haven't "just crocheted" in awhile and this stuff feels so soft! I couldn't resist, and while I actually have to pay attention to most stitch work, the crochet I can just do without really watching my hands. It made attending my daughter's TaekwonDo testing a bit more enjoyable. I do like to watch her when she is actually doing something, but at testing it can be a lot of waiting too. So I got a goodly bit done while I was there...
I'll add fringe at the ends when the scarf is done. I love how it feels so far. It is going to feel heavenly around my neck :) I am always amazed at how wonderful bamboo feels.
Here is a picture of my daughter at her testing :)
She passed, so she now has green strips on her belt...She was so proud of herself :) Her brother will test in April for his next rank. He is just a few short steps away from his black belt. A bit nerve wracking for him, but I know he can do it.
The last thing I have been playing around with is an old kit that resurfaced when I was looking for a scroll frame for the cuffs. It is an African Folklore kit and it is rather fun to do. It is all very simple as there aren't any rules to the piece at all. The design is printed on the cotton fabric, and you are provided a hank of riotous colors to play with. The threads are a mix of cotton perl and wool and are very bright. It is the perfect thing to pick up your spirits when the lack of sun starts getting to you. I have been doing mostly chain stitch and some stem. I rather like the look of the voided spaces rather than filling it up with satin stitch. It is my other "travel around" kit right now.
That is it for now. I know I need to get more on track, but I think the influx of new snow hasn't helped my sense of wanting to hibernate. I could really use some green about now....
Saturday, February 21, 2009
Catching up...
I haven't had a chance to get on here and update, so I am a bit behind. I haven't actually worked on my main project at all. I feel terrible about that, but I am not surprised as I have been busy with a lot of other things.
I have gotten the last badge finished for the West Kingdom cloaks. Thank goodness! I did both devices with split stitch as the main background and I used chain stitch and stem stitch for details and outlining. I think it will put up with wearing and some abuse. We shall see :)
I have also gotten the lace started for my friend's wedding and I have about 5 inches done so far. I had to do a repair already as I had a baby pull one of the bobbins and break the thread. Oh well... I have tied in a edge and center gimp using Caron Watercolors in a green variegated. Her colors are green, white and blue, so I will use blue ribbon to attach the lace to.
One of the main reasons I am behind schedule is that I have spent the past month helping my daughter's Girl Scout Troop get ready for "Thinking Day". This is a yearly event where the girls focus on learning about scouts from other countries, and the challenges that can be faced by scouts and the world population in general. Our country focus this year was Kenya, so we made painted shields, learned a hymn is Swahili, and even made some Irio (good Kenyan food!) for the girls to try. Our troop covers all ages from Daisys (kindergarteners) all the way to Seniors (high schoolers) and we tend to try and keep our activities open to all activity levels as we also have some special needs girls as well. It is worth every minute of time away from my projects to help the girls learn something new and have a great time :)
My daughter Genni painting her shield :)
(added later...boy...) I also forgot to mention that it was my month to teach a class for our needlework guild. So on top of everything else, I had to assemble 20 Sashiko kits and handouts for a class in this particular style of Japanese embroidery. It is cool stuff actually, and it is pretty simple, but very striking. Here is a cool site to get a basic overview of how to do it http://www.purlbee.com/sashiko-tutorial/. I get most of my supplies at http://www.shiboridragon.com/sashiko.htm ....there you go :)
So anyway, I do have a lot to catch up on and time is starting to get crazy. My intent is to actually get the smocks mostly assembled by the end of next week, and get the blackwork cuffs strongly started....we all know what intentions are good for... :P
Tuesday, February 3, 2009
ADHD anyone?
It is Tuesday, and I haven't gotten very far with my main project. It isn't surprising though. I am a member of a modern needlework group, and we do a big retreat the last weekend of January. So instead of working on my outfit this past weekend, I sat and watched movies, used the jacuzzi and generally lazed about. I did get a few things done though. I had agreed to work on two patches for a set of cloaks being made for the King and Queen of the West (for the SCA). The cloaks will be covered in patches that are the arms that stand for each of the groups that exist in the West Kingdom. I agreed to do our group, Winter's Gate, and the Juneau group, Earngyld. I actually got the Winter's Gate one done (yeah me!) and I have the Earngyld one set up. I did the Winter's Gate one in split stitch for the main background, and chain stitch for both the estoilles and laurel leaves. I used stem stitch for the laurel branches. It was fun to do, and should hold up in wearing.
I am not sure what I will do for the Earngyld one yet. I may stick with the split stitch as it is a tough wearing stitch. I want it to look good, but I also want it to wear well also. Decisions, decisions....
When I got back from the retreat, I was all set to get started sewing the smocks together....good intentions and all that :) However, I received my new bobbin lace pillow in the mail, and it needed to be covered. I adore my wool stuffed cookie pillows that are my mainstays here, but I needed a roller pillow and preferably something a bit lighter than what I had. I ordered the One and Only from http://www.snowgoose.cc/ Pete is an awesome storekeeper, and I would recommend his website full heartedly. The pillows are made from foam, are light, but are also very resilent. I have a garter that I need to get started for a wedding in early June. The bride is a good friend, and I look forward to getting started.
I did get the smock cut out, and I even got my cuff design worked out for the blackwork I want to do on them. I have picked up some black silk to do the blackwork on, and as the smocks are made from 100% hanky weight linen, it will be a pleasure to work on.
One last note before I run away for the night...I had some really neat visitors yesterday. I have lived in Alaska for nearly 28 years, but seeing Moose really close is still a great thrill. I had a mother moose and twin babies visit my yard yesterday. they had a grand time nibbling on the birch tree right outside my picture window. In fact, before they wandered off, one of the babies got right up close to look in. That was sooooo cool :) Yet one more reason I put up with the cold and snow....
Subscribe to:
Posts (Atom)