One of the projects was to make new garb for a fellow SCA'er friend of mine. He is shifting his preference and persona from early Renn to late Viking. He thus needed new tunics, new trousers, and even a tunic he could wear over his armor. He picked up the fabric and chose the colors, so I got to make two light linen, white undershirts, three different medium weight, blue/black linen shirts and one set black trousers. He chose a heavyweight linen in black and yellow for his fighting tunic, but I'll get to that later. Since he was prince during this time, I wanted at least one of his shirts to be "spiffy" rather than have all of them be basic...good, but still basic ;) When I started work on the first tunic, word came to us that he was going to be knighted. This definitely changed my tack on getting his first tunic done. I had planned on doing the seams with the machine and a surger edged finish, with the color borders hand stitched where it showed. However, the knighting made me want to kick up my game a good bit. So, I still did the big seams with the machine, but then all the external edges and all the seams were hand finished. the same went for the under-tunic. I wanted him to be able to pass any and all "laurel handshakes" that he could be subjected to. For those not familiar with the term "laurel handshake" it is when you greet a person who has been given the highest level award for the Arts (including sewing) and they greet you back while inspecting your clothing. It can be rather daunting but also a complement, so I really wanted him to look good. It isn't often that you get to dress a prince, especially when he is getting knighted :)
Anyway...while getting the tunic started, I came upon the bright idea of getting the other stitchers involved by having the color border sections embroidered. I enlisted the aid of my friend Grete who does amazing Viking embroidery. She drew out the design on the yoke, the sleeves, and the hem, and then she, myself and a few others hunkered down and got the embroidery done in less than a week. I finished the assembly of the tunic before I left the house for the 6hr trip to Anchorage, but the seam finishing on the undershirt was finished on the road. I ended up doing the last little bit by flashlight. Whew! But he did look very spiff, and he was VERY surprised that we went to so much trouble. It was fun, and surprising a person like that is always a joy :)
 Not bad, eh? :)
Right about the time I was teaching him to make his tunic, we had a few new people show interest in the SCA. all of these gals wanted to make their own outfits, and they were all beginner to intermediate sewers. A T'tunic is really the "jeans and T'shirt" of nearly 1000 years, so it is a great starting point for new garb makers. In several individual sessions, I got all the girls into new clothing of their making, and off to make even more garb using that "T" pattern as a basis. So far so good :)
Okay...guy clothes, newbie sewing classes...what else... Oh yeah, I also sized down a set of my daughter's outgrown garb into a set of garb for the little two year old that lives with us. She is growing like the proverbial weed, so is in constant need of new clothes. Rather than just cutting down the larger garb (which was made for a 10yr old), I was able to take growth tucks in the back, sides, shoulders, and hem. It should, with luck, last her for several years. Hopefully she'll wear it out before she grows out of it. She does have an underdress, but "onesies" are great quick substitutes for little ones.

Her Mom also came to my notice as she was getting frustrated with her garb also. She and I have been doing a good bit of "life-style" change (using sparkspeople.com), and we both have been losing weight. It means that her garb isn't fitting right anymore, and is really too loose shaped for her to feel pretty or even comfortable in anymore. I had two kirtles that I wasn't wearing anymore, and they suited her quite well. However, they needed a bit of adjustment as I am a great deal broader in the shoulder than she is. She is bigger in the chest, but she still needed the shoulders fitted to her. After a bit of tweaking, I got it all to fit. The funny part, to me anyway, is that even though she is 5'6" to my 5'3", I didn't need to let out the hem or add a guard. I knew I was short torso-ed and long legged, but sheesh. Oh well, she looked good and I got two dress out of my overloaded garb closet. I didn't get a picture of the blue one, but here is the black one on her. The chemise is her own.


After getting garb done for the little one and her Mum, it came to my attention that my two youngsters had also grown a good bit. So new garb for them too. My son, who has been focused on 16th century Japan, decided that he wanted to travel the spice road north-west and go for Steppe Russian clothing instead. No biggie. He found pictures of what he wanted, and I got it made. He was given 6 undershirts in white cotton with black and red trim, so we tried to match the trim on his black linen over-tunic. He also got new pants out of the same linen. I have more of the trim for the overcoat he wants. Now I have to bite the bullet and get the wool that is needed. He wants it in red coat wool. Mmmm, right up his Mom's favorite color alley ;) I'll work on getting him another set of pants when I do his coat.
My daughter was another case all together. While she does love her coathardies, she also competes in Rapier. She has been bugging me for more middle eastern style clothing that gives her the ability to wear pants. Since she is 12, even though she is shaped like a woman, she plays like a tomboy, so making her clothes like that is actually a smart idea. I found a couple of tunics for her at our local second-hand store, as well as a couple of pants. I really wanted her to have court style garb, and she suggested a sari. So, off to the fabric store we went in search of good sari fabric. She found a beautiful green and gold she liked, and we picked out matching fabric for her choli and pants under the sari. Now came the hard part. She is 12, and the process of tucking and folding the sari (over and over) would have had her coming to me every five minutes or so. I needed to find a way to have the sari be easy to put on and take off. Using a piece of elastic around her waist, I tucked, pinned and stitched to sari as I put it on her. Using hooks and eyes and additional elastic, I was able to create a easy-on waist band for her to put on her sari herself. The sash that went over her shoulder was held pleated with a large kilt type pin, and then pinned to her shoulder. It worked like a charm.
 My son...
 My daughter. Not bad if I say so myself :)
I also did garb for myself. Silly actually, as I will most likely have to take it in a great deal if I keep on losing weight (I am already down nearly 30lbs since I started...sorry, but I needed the "Yea, Me!" moment), but I really wanted GOOD kirtles that would work with Italian, Tudor, and Flemish dresses. My favorite kirtle is a front lace that is in a blue that isn't exactly period. I know this and wear it anyway as it is the color blue that our Principality uses. I did spiff it up a bit more by adding short sleeves that are stitched to the kirtle at the top, and it has red wool pin-on sleeves, a white linen ruffled partlet with blackwork embroidery, and a black wool over-partlet, as well as a red linen apron. I didn't get a picture of the full front of it, but someone got a shot of my back during morning court. I think it looks pretty good, and in the wet, cold, persistent drizzle, my sleeves and over-partlet kept me quite warm.

The other kirtle was a much bigger deal. I did a good bit of research looking at tons of paintings, Janet Arnold's Patterns of Fashion Book 4, and lots of other SCA costumer's sites. I came to the realization that the basic kirtle (ie: supportive underdress) was pretty much similar if not totally the same in quite a few countries. Armed with Drea Leed's Flemish Working Woman's Dress book, my knowledge of the early Tudor kirtle, the Tudor Tailor book, and the festiveattyre.com site, I put together a kirtle that I felt I could use in the different areas I wanted to. I did take the extra step and tried the hemp/reed boning, and it was a success as far as I am concerned. I will not wear a corset because of the way my fibromyalgia reacts to that constriction, but a snug fitted kirtle actually feels good, and the hemp boning was actually amazingly comfortable. Since I was wanting to try an Italian (I actually like the sleeves better) the hemp/reed boned kirtle was a good choice. It had ties at the shoulders that allow me to mix and match with many different types of sleeves. For our Coronet tourney this month, I used a pair of sleeves I had made for an Italian (long ago), I hand stitched a sheer silk parlet in the Italian style, and I made a giornea (Italian surcoat/over-dress), and a Juliet cap to finish it off. I don't have a good picture of the cap, but even still, it looks pretty good. I ran out of time before the event to get the gionea done by hand, so I machined it. I will probably tear out the hem and do it by hand, and I do want to add a clasp and take the back of the neck a bit lower.
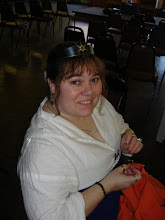
 before the weight lost...
  30#s down and still losing.... :) Btw, the spiffy lady next to me is in Germans. Isn't she pretty? No, I haven't felt the urge to make myself Germans, but I have agreed to help someone else ;)
What else besides garb have I done? Hmm..... Oh yeah. I have completed three needlebooks, one as a gift and two as prizes for Arts and Sciences competitions. I completed two more ring pouches, one for myself and one as a object for an Artisan auction being held this fall. I taught a basic beginning embroidery class at an A&S meeting, and I taught a begining Torchon bobbin lacemaking class at Coronet and I taught another person how to make the ring style pouch so that she could make one as a gift. I designed and made 19 girdle books for my room-mate to embroider for the princess to give as ribands/gifts, made two napkins/cup-covers for a gift, and I quilted a checker board for a game set. In amongst all of that, I also did a bit of doll making, painted a doll house and made furniture, and I made up a little gnome math counting game set. Nah, not busy at all ;) I won't post pictures of all of that here on the blog, but if you feel curious enough, then you can check out my page at http://west-arts.nig.com/profile/MargeryGarret where I will put all the pictures up.
I make no promises that I will update this in a more timely manner...that just sets me up for trouble :P But I do promise to keep working on things and learning and doing more and more, and I challenge you to do the same. Till next time :)


